Why Model Year Defines Fairing Fitment
Motorcycle fairings are the molded body panels—nose cones, side covers, tail sections—that cover a bike’s internals and give it its shape. Manufacturers tool each panel for one model year and generation, so ordering by model year is the most reliable way to get a fairing that fits. Decoding the vehicle identification number (VIN) tells a buyer or a shop the exact year and body revision a machine was assembled with.
Even small mid-cycle updates move the mounting points. A facelift that reshapes a headlight or narrows a radiator shroud can shift bolt holes, relocate tab mounts, and change panel gaps by several millimeters. Photographs won’t show any of that, so a set chosen by eye can arrive and still refuse to line up with the frame.
The rest of this guide covers how to confirm the exact model year and body revision before you buy: reading a VIN for year and generation data, tracking the body changes that move bolt holes, and a checklist to run before checkout. It’s written for repair shops sourcing replacements, enthusiasts restoring or customizing a bike, and owners ordering parts after a crash.
VIN 10th-Character Model Year Code and Fairing Family Reference
The 10th character of the VIN—a digit or a letter—gives you the model year. The codes below follow the standard ISO 3779 model-year cycle; the letters I, O, Q, U, and Z are skipped so they can’t be confused with 1 and 0. Once you have the year, cross-check the fairing generation to see where mounting points and side-panel tabs tend to move.
The year codes are standard. The generation labels and bolt-hole notes in the table are generic illustrations of the kinds of changes to watch for, not data for a specific manufacturer.
| 10th VIN Character | Assigned Model Year | Typical Fairing Generation | Common Bolt-Hole Change Notes |
|---|---|---|---|
| V | 1997 | Late analog-era full fairing | Baseline anchor points; side tabs largely fixed |
| W | 1998 | Facelift analog fairing | Minor mid-panel tab shift; upper mounts unchanged |
| X | 1999 | Facelift analog fairing | Lower cowl bolt spacing revised slightly |
| Y | 2000 | Early digital-cluster fairing | Side-panel tab location moves forward |
| 1 | 2001 | Round-headlamp full fairing | Upper stay bolt pattern standardized |
| 2 | 2002 | Round-headlamp full fairing | Nose-panel clips repositioned |
| 3 | 2003 | Facelift round-headlamp fairing | Lower radiator-shroud mounts widened |
| 4 | 2004 | Facelift round-headlamp fairing | Side vent tabs added near mid-panel |
| 5 | 2005 | Angled twin-headlamp fairing | Upper fairing stay redesigned |
| 6 | 2006 | Angled twin-headlamp fairing | Mirror-mount bolts relocated |
| 7 | 2007 | Angled twin-headlamp fairing | Belly-pan tab spacing revised |
| 8 | 2008 | Aggressive wedge fairing | Side-panel tab moves rearward |
| 9 | 2009 | Aggressive wedge fairing | Lower cowl fastener count reduced |
| A | 2010 | Winglet-preview fairing | Upper cowl bolt holes shifted outward |
| B | 2011 | Winglet-preview fairing | Fairing stay bracket recontoured |
| C | 2012 | Winglet-preview fairing | Side-panel clips repositioned |
| D | 2013 | LED-headlamp fairing | Nose-panel mounts changed |
| E | 2014 | LED-headlamp fairing | Upper stay width revised |
| F | 2015 | LED-headlamp fairing | Lower fairing tabs realigned |
| G | 2016 | Mass-forward fairing | Belt-line tab pattern reset |
| H | 2017 | Mass-forward fairing | Side vent mounts added |
| J | 2018 | Mass-forward fairing | Upper cowl bolts spaced wider |
| K | 2019 | Winglet-era full fairing | Aero tab anchors repositioned |
| L | 2020 | Winglet-era full fairing | Fairing stay reinforced; minor bolt-pattern change |
| M | 2021 | Winglet-era full fairing | Side-panel tab spacing updated |
| N | 2022 | Integrated winglet fairing | Upper mounts carry over from prior two years |
| P | 2023 | Integrated winglet fairing | Lower cowl bolt pattern reset |
| R | 2024 | Streamlined winglet fairing | Nose-panel fastener layout revised |
| S | 2025 | Streamlined winglet fairing | Side fairing tabs isolated to this generation |
| T | 2026 | Streamlined winglet fairing | Current pattern; shared with mid-decade refresh |
Bolt holes rarely change on neat model-year boundaries; they cluster around generation refreshes, which come roughly every two to three years. Panels from years inside one generation often share tab geometry, while a mid-generation body change can move the nose-panel and upper-stay anchors. Confirm the generation, not just the year, before you commit to a panel set.
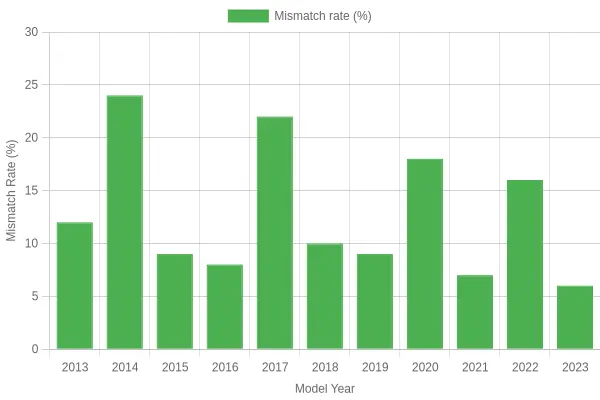
Fairing Fitment Mismatch Rate by Model Year
Most fairing fitment problems trace back to body revisions. When a manufacturer changes the tank shape, side panels, or subframe, bolt holes shift by a few millimeters, and a kit that fit perfectly last season suddenly won’t line up. The chart below shows how mismatch rates rise in years tied to known body changes and fall during stable production runs.
The chart makes the pattern clear: years tied to body revisions show higher mismatch rates, while the stable years between them stay in the single digits. That is why ordering by model year, not by a photo of the bike, matters.
Step-by-Step Fitment Verification Checklist
Run these checks in order before you order anything. Each one catches a mismatch a photograph can’t show.
- Locate the VIN. Find the 17-character VIN stamped on the steering neck or frame, and write it down exactly as it appears.
- Read the 10th character. The 10th character encodes the model year, so decode it against a standard VIN chart to pin down the exact production year.
- Cross-check the frame and engine number. Compare the frame stamp and engine casing number with your VIN record to confirm the bike hasn’t been rebuilt with donor parts from another model year.
- Compare generation-specific trim details. Look at fairing shape, windscreen angle, and mounting brackets for your generation, since these changed between model year updates.
- Confirm the OEM part numbers. Match the seller’s listed numbers to the numbers on your original panels or a factory parts catalog before you commit.
- Match paint and decal schemes to the model year. Identical-looking paint was carried across multiple years with small decal changes, so verify the color code and graphic layout belong to your production year.
- Confirm the fairing set’s listed compatibility range. Read the range on the listing and make sure your decoded model year falls inside it, not just on the edge.
- Inspect bolt holes and mounting points. Count the holes, measure their spacing, and compare tab positions to your frame; even a 5 mm shift means the panel will not seat.
- Ask the seller to verify in writing. Request confirmation that the part number, color code, and compatibility range all match your VIN before payment, so you have documentation if a return is needed.
The whole sequence takes about ten minutes and heads off the most common way people waste money on aftermarket bodywork: ordering by photo instead of by number.
How to Read This Diagram
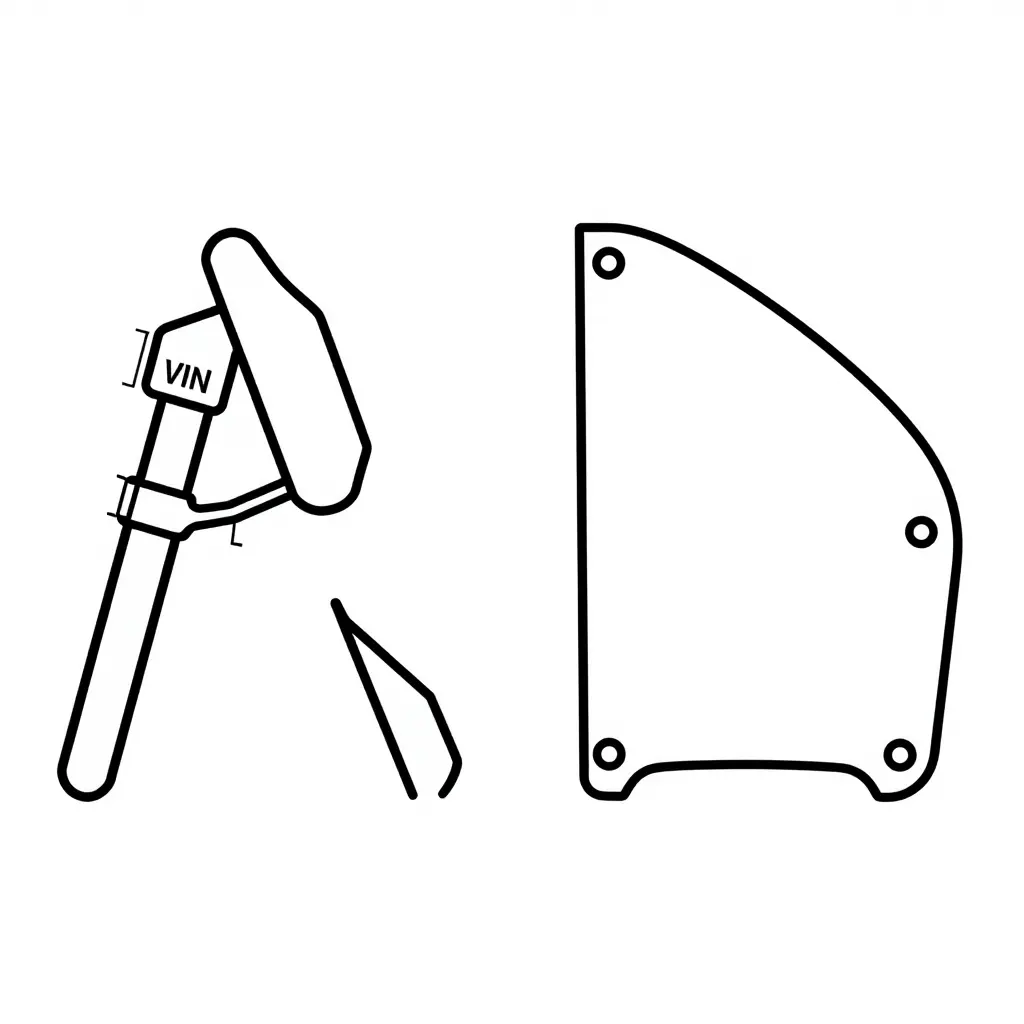
The drawing shows the two things you need in order to match a panel to a bike: where the VIN actually is and how the fairing bolts up.
- Left side – a simplified side profile of a motorcycle steering head and front frame tube. The small rectangles mark typical VIN plate positions: one on the steering head, one on the frame. These are the two places to check when a bike has no paperwork.
- Right side – a generic curved body panel with a row of circular bolt holes along the top edge and mounting tabs with bolt holes along the lower edge. This is where model-year changes quietly move everything a few millimeters.
Pairing them makes the point: the number stamped near the steering head gives the true model year, and the year decides where those bolt holes sit. A listed panel can look identical in photos while its mounting geometry is completely different, so decode the VIN before you order.
OEM Part Numbers and Generation Codes: The Second Layer of Confirmation
Decoding the VIN narrows a search to a specific model year, but it rarely tells the whole story. Two machines can share a model year and still carry different body panels, which is why shops treat OEM part numbers and generation codes as a second layer of confirmation before ordering motorcycle fairings.
Why Part Numbers Change When Panels Are Revised
Manufacturers revise body panels constantly, and every revision produces a new OEM part number even when a panel looks identical at a glance. A mid-cycle refresh can relocate turn-signal cutouts, reshape a windscreen base, or shift a bolt hole by a few millimeters. The part number records that change, and it is more reliable than a photograph.
How Superseded Numbers Can Point to Different Mounting Geometry
When a part is updated, the catalog often supersedes the old number. Follow that chain: a superseded number may describe a panel that fits the original tabs, or a redesigned panel with altered mounting geometry that requires matching brackets and hardware. Assuming every superseded number is a drop-in replacement is how mismatched kits end up sitting on a shelf.
Fairing Kits Are Grouped by Generation, Not by Appearance
A generation groups motorcycles that share a frame, subframe, and mounting points, a span that often cuts across several model years. Fairing kits are engineered to one mounting pattern, so sellers group them by generation rather than by paint or silhouette. Two machines that look nearly identical in photos can belong to different generations and accept completely different panels.
How to Read a Parts Catalog Entry
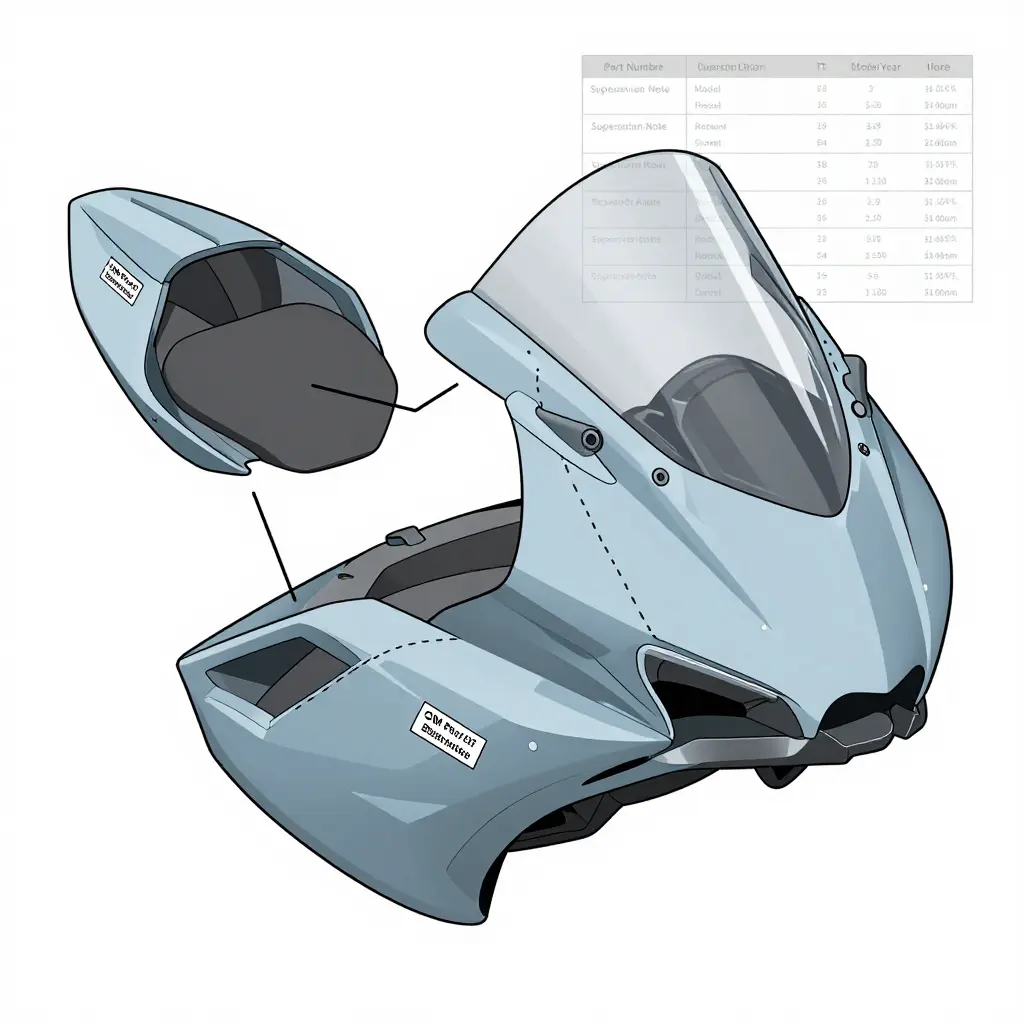
Read a catalog entry from left to right and treat each field as a filter. Start with the model and generation code, then confirm the model-year range, then read the OEM part number and any supersession note. Finish with the mounting-geometry callout and required hardware, which tells you whether the panel bolts to the existing subframe or demands a different bracket set. If any field conflicts with the VIN, stop and verify before ordering.
| Catalog Field | What It Confirms |
|---|---|
| Generation code | Shared frame and mounting pattern |
| Model year range | Alignment with the decoded VIN |
| OEM part number | Exact panel revision |
| Supersession note | Whether mounting geometry changed |
The VIN identifies the bike; the part numbers, the generation, and the model-year range together confirm the panel will actually bolt on.
Common Ordering Mistakes When Photos Replace the VIN
Photos sell bikes, but they are a poor way to identify parts. When a listing image stands in for a VIN, these are the mistakes that follow.
- Ordering from marketplace photos and the model year in the title, when a thumbnail hides the frame revisions that decide whether the panels line up.
- Assuming a facelift shares mounts with the earlier version, when even a minor nose update can relocate bolt holes by a few millimeters.
- Trusting listing titles that drop the generation code, so a “2015 CBR” could point at two completely different chassis.
- Ignoring paint and decal differences tied to a specific year, since graphic kits often changed without any change to the bodywork itself.
- Mixing up trims within a single year, because a base and a sport variant can carry different side panels and mounting tabs.
- Relying on a seller’s “fits most models” claim, which is rarely checked against a VIN and rarely survives fairing fitment at the bench.
- Skipping close-up shots of the mounting points, the one angle that actually shows whether the bolt holes match your bike.
- Forgetting that aftermarket bodywork uses its own hole pattern, so even a correctly identified year can still mean drilling and filing.
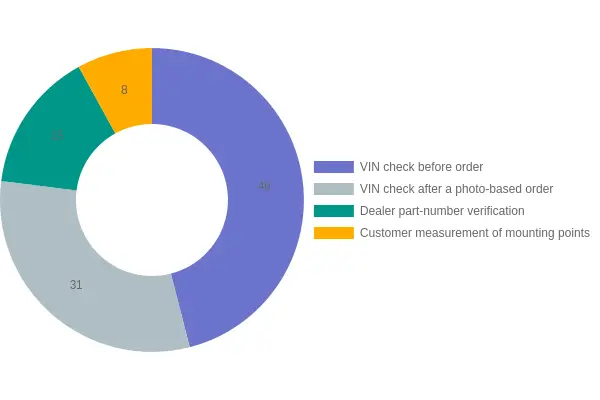
How Order Corrections Are Triggered
The chart shows one thing above all: the biggest driver of corrected orders is catching the problem before the order is placed. Shops that decode the VIN first avoid nearly half of would-be mix-ups. Buyers who rely on a photo and order first push corrections back up. The gap between “VIN check before order” and “VIN check after a photo-based order” is the argument in one image.
Reading the slices
| Trigger for a correction | Share of corrections |
|---|---|
| VIN check before order | 46% |
| VIN check after a photo-based order | 31% |
| Dealer part-number verification | 15% |
| Customer measurement of mounting points | 8% |
(Figures are illustrative, used to show the relative weight of each trigger.)
- VIN check before order (46%). Large because decoding the model year up front removes the ambiguity behind most fitment failures. Photos hide trim levels, mid-cycle body changes, and the small shifts in bolt-hole positions that separate one model year from the next.
- VIN check after a photo-based order (31%). The buyer ordered from a picture, then found the fairing didn’t line up. The correction comes only after the part is in hand, which means downtime, return shipping, and a second order.
- Dealer part-number verification (15%). Cross-checking an OEM part number against the VIN is a solid backstop, but it depends on the dealer’s catalog being accurate and current.
- Customer measurement of mounting points (8%). Taping a ruler to the bike is the least reliable method, because fastening points move with body redesigns, not with the metric the customer measures.
Why the model year, not the photo, should lead
Most of the triggers above fire only after a decision has already been made. The slim 8% slice for measuring mounting points sounds reassuring until you consider how often a measurement taken on a previous fairing doesn’t match the new geometry. Body panels evolve between model years, and those changes move bolt holes, clip positions, and mounting tabs by enough that no photo will reveal it.
Let the VIN decode do the work first. It carries the exact model year, so it identifies the correct body revision before anyone commits to a part. That is why the largest slice in the chart sits where it does: model-year verification through VIN decoding prevents fitment problems instead of correcting them afterward. Shops that order VIN-first spend less time on returns and more time on the bikes that pay the bills.
Fairing Fitment and VIN Decoding: Frequently Asked Questions
Where can I find the VIN on a motorcycle?
The VIN is stamped on the steering head, the frame neck just behind the handlebars, and it is usually visible without removing body panels. It also appears on a metal compliance plate riveted to the frame, on the registration and title documents, and often on a secondary sticker on the frame downtube.
Is the 10th character of the VIN always reliable for decoding model year?
For most vehicles built after 1980, the 10th character encodes the model year using a standard alphanumeric sequence. It is not foolproof, though: some manufacturers apply their own conventions, and motorcycles built for markets outside North America may not follow the same rule. Treat VIN decoding as a starting point, then confirm the model year with a dealer database or the manufacturer.
Will motorcycle fairings from one model year fit another?
Not always. Even within a single generation, manufacturers frequently revise bodywork, mounting brackets, and bolt holes between model years. A redesigned panel can look nearly identical in photos yet place its bolt holes a few millimeters off, which is enough to prevent a clean fit. Confirm the exact model year and generation before ordering.
What should I do when the VIN model year differs from the title?
Mismatches usually stem from title transfer delays, clerical errors, or a vehicle titled in a different year than it was built. Contact your state or provincial motor vehicle agency to correct the record and verify the true model year from the VIN. Keep copies of all correspondence, because a stamped-versus-titled year discrepancy can complicate both resale and how model year affects resale value.
How do paint codes relate to model year?
Paint codes identify the exact color and finish applied at the factory, and they often change from year to year even when the marketing color name stays the same. Two bikes can share a name such as “Pearl White” yet carry different paint codes and slightly different shades. Match fairings using the paint code, not the color name alone.
Do universal fairing kits exist?
Some aftermarket sellers market “universal” fairing kits, but they rarely fit a specific motorcycle without modification. True fairing fitment depends on model-specific bolt holes, bracket geometry, and body contours. Most universal kits require drilling, trimming, or custom brackets to install correctly.
Why order motorcycle fairings by model year instead of photos?
Photos can mislead, because lighting, camera angles, and aftermarket modifications hide important differences. The model year, confirmed through VIN decoding, identifies the exact bodywork generation and its mounting points. Ordering by year rather than by picture reduces the risk of receiving panels whose bolt holes do not line up.
Can I verify fairing fitment before I buy?
Yes. Compare the seller’s part numbers, model year, and generation against your own bike’s details, and check any published fitment charts. Where possible, measure the spacing of your existing bolt holes and compare it to the specifications the seller provides.
Ordering Your Fairing Set: Catalog Range, Savings, and Support
Once you know the correct body generation, ordering is straightforward as long as you hand over the right details up front. The supplier behind this guide is a motorcycle fairing exporter with more than 3,000 styles in its catalog, covering most major models. That depth matters when a single production run introduced fresh bodywork, because the catalog is organized around fitment rather than generic appearance.
What to send with your order
The most common reason a fairing order goes wrong is incomplete vehicle identification. To avoid a return, include the following when you place the order:
- The exact model year, not just the model name, since panel shapes and bolt hole positions shift between generations.
- The full VIN (vehicle identification number), which lets the supplier decode the precise build and confirm the correct mold.
- The specific panels or a complete kit, so the right fairing set is matched to your bike.
Supplying the VIN alongside the model year lets the team cross-check the assembly, so a fairing set that fits one batch is never accidentally shipped for another.
Savings and support
Buyers who order through this export channel typically pay 10-40% less than the prices advertised on other sites, largely because the catalog ships direct instead of passing through several intermediaries. If you are benchmarking a fair figure before you commit, reviewing how pricing stability plays out across vehicle markets gives you a useful reference point. For shops that source parts and complete vehicles side by side, weighing dealer channels against auctions can sharpen how you compare total landed cost.
Support is direct too: any question you send before or after ordering gets an answer within six hours, so you are never left guessing about fitment, availability, or lead times. A deep catalog, lower comparative pricing, and responsive answers make the purchase a predictable one.
Photographs show the shape, color, and finish of a fairing, but they cannot tell you the model year or generation it was engineered for. That is why the dependable route is ordering fairings by model year and generation, using the vehicle’s own identity as the reference point instead of a picture that may be outdated, mismatched, or borrowed from another listing. When a fairing is matched to the correct year and generation, the panel lines, wiring clearances, and mounting points line up the way the manufacturer intended.
Three checks make that match trustworthy: VIN decoding reads the 10th character to confirm the model year and its generation; OEM part numbers tie the fairing to a specific model, trim, and production range; and a physical comparison of the mounting points—the bolt holes and their spacing—confirms real-world fairing fitment before you tighten a fastener. Together they replace guesswork with a documented match.
Ordering by decoded year and generation, rather than by photographs alone, is simply the most accurate way to get the right part.